One of the most common ways of sending out emails in PHP projects is through the mail() function. However, according to the official documentation, PHP mail() is not suitable for larger volumes. Here is what it states:
It is worth noting that the mail() function is not suitable for larger volumes of email in a loop. This function opens and closes an SMTP socket for each email, which is not very efficient.
As you can see, the PHP itself discourages using the mail() function for sending out a vast amount of emails. This encourages PHP developers who use PHP hosting to explore other options.
Default WordPress Email Setup
By default, WordPress also uses the PHP mail() function to send out transactional emails such as user registration, order confirmation, forgot password, etc. Most of the time, such emails are marked as spam.
This guide will explain why these emails are marked as spam and how you can increase email delivery by setting up a WordPress SMTP service provider to your website.
- Why Do WordPress Emails Get Marked as Spam?
- Use SMTP for WordPress Emails
- Set up SMTP Service on Server
- WordPress SMTP Plugin
Why Do WordPress Emails Get Marked as Spam?
You might have observed that the emails from your WordPress website landed in Spam/Junk folders. In most cases, it happens if you are hosted on a shared WordPress hosting environment where every user shares the same server IP address. Now, if any ONE of the users sharing the IP address is marked as Spam, the entire server will be marked as spam.
Thus, no matter what, every email originating from this server will be detected and marked as spam by the email service providers such as Gmail, Outlook, Yahoo, etc.
If your customers/subscribers are not receiving emails, ask them to check out the Spam/Junk folder. If that’s the case, the most likely cause is that the server IP is marked as spam or the server is not sending out the emails. Another important reason is that the hosting provider blocks the respective port.
If your WordPress emails are marked as spam and/or the subscribers aren’t receiving the emails, this guide is specifically for you.
Use SMTP for WordPress Emails
SMTP stands for Simple Mail Transfer Protocol. It is a service used to send out emails from a hosting server to the final recipients or to intermediary servers in between.
Many WordPress SMTP plugins allow you to configure and send all outgoing emails via an SMTP service provider. Alternatively, you can set up SMTP on your hosting server. This will prevent your emails from landing in the Spam/Junk folder of the recipients.
As far as WordPress is concerned, I believe that SMTP is a good alternative to the PHP mail function. Once configured properly, it will send all outgoing emails via the SMTP server, ensuring that the email appears to originate from an authorized source.
Let’s start by configuring WordPress SMTP settings on a server first. Later, we will set up SMTP via WP Mail SMTP (an SMTP plugin).
Set up SMTP Service on Server
In many cases, users often have several websites on a single server and want to use the same WordPress SMTP service for all of them. In this case, the ideal solution is to set up SMTP on a server instead of setting it up on each WordPress site separately.
If you are a Cloudways customer, log in to your account, and click on the Servers tab located in the left corner of the top admin bar and get into your server. From the left pane, go to the SMTP tab.

You will have two options:
- Your Own SMTP: Choose this if you plan to use a third-party service like Gmail SMTP, Mailgun, Sendgrid, etc.
- Elastic Email: We are partnered with Elastic email, an SMTP service provider; choose this option if you want to set up SMTP easily.
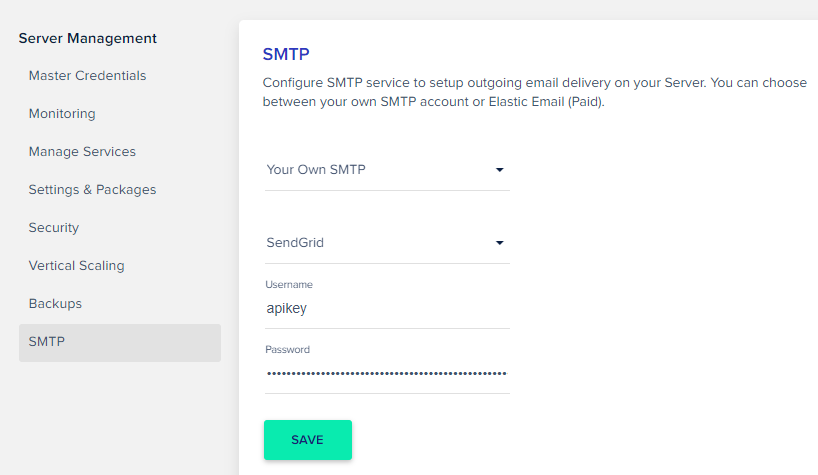
In this guide, we will use Your Own SMTP to select an SMTP provider from the available options.

And if you select any of the above (except Other), you will be asked for the username and password of the respective SMTP provider.
In this guide, I will cover Mailgun and Sendgrid from available options and Gmail SMTP via Other options.
Configure Mailgun SMTP for WordPress
Mailgun is an email automation service owned by Rackspace. Mailgun is considered one of the best WordPress SMTP providers. It allows you to send, receive, track and store emails easily and is used to send newsletters, notifications, or anything you want to distribute among your subscribers.
Another advantage of Mailgun is that it allows you to send 5,000 emails per month for FREE without requiring a credit card but limits you to 300 messages per day. Check out the details here, and if you need more emails, they have an excellent pricing model.
First of all, you need to have an account with Mailgun. Once created, log in to your Mailgun account, and visit the Mailgun dashboard. Since I want to use my domain name for sending emails, I need to add my domain name to Mailgun. From the top menu bar, go to Domains and click on Add New Domain.
Note that you may need to add a credit card before adding a custom domain name.

Once added, Mailgun recommends verifying the domain name to ensure smooth processes. Here is an excellent guide on how you can verify your domain for Mailgun. If you have any questions, ping your DNS register for help.
Here are a few reasons why you need to verify the domain.
- Verified domains are not subject to the limit of 300 outgoing emails per day.
- No more sent via Mailgun.org footer text in your emails.
- Mailgun is less suspicious of traffic that is being sent by verified domains.
I assume that you have followed the guide and verified the domain name. To get SMTP credentials, navigate to Sending (1) -> Domain Settings (2), and select the domain name (3) from the top drop-down then click on SMTP credentials (4).
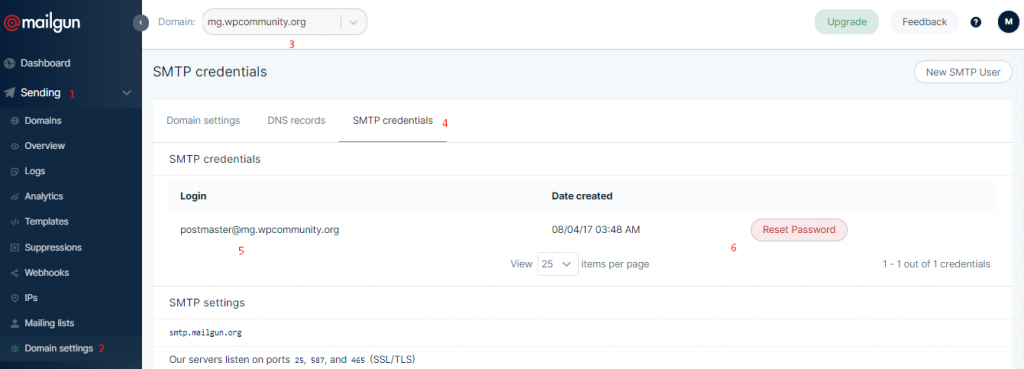
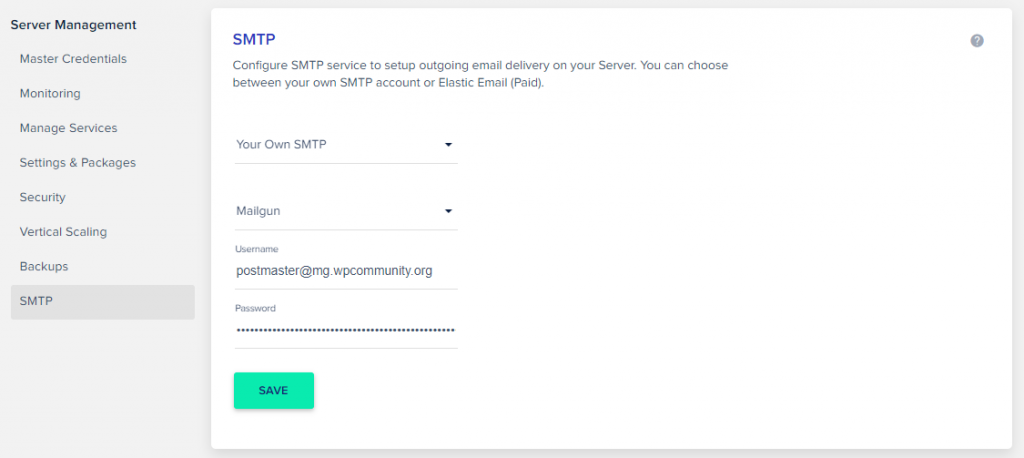
Copy email address (5) and paste it into the Cloudways platform. To get a password (6), click on the Reset Password button. It will generate a password, copy and paste it into the Cloudways platform.
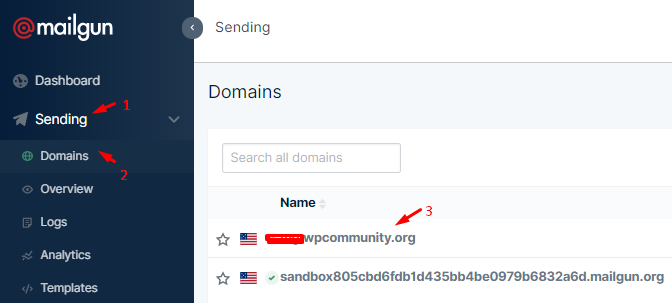
To update DNS records, navigate to Sending -> Domains and get into your domain name and follow the essentials.
Configure SendGrid SMTP for WordPress
Just like Mailgun, SendGrid is a cloud-based SMTP service provider that allows you to send and receive bulk emails. SendGrid is ideal for marketing campaigns and transactional emails without worrying about the emails being marked as spam.
Here’s a trivia that highlights the importance of SendGrid: Over 58,000 paying customers use SendGrid to send more than 35 billion emails every month.
SendGrid also offers a free to try plan known as Essentials that includes 40,000 emails, free for 30 days, and send 100 emails/day for free forever.
First thing first, you need to create an account with SendGrid.
Important Note: Sign up with the same email address you’d like to set the From Email. These two emails will need to match in the later steps.
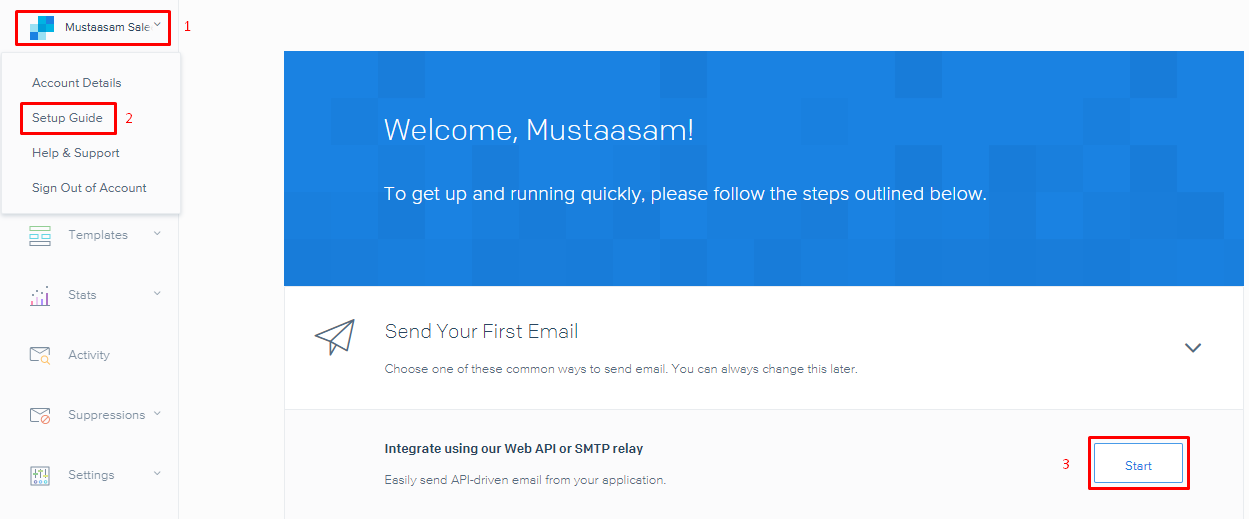
I assume you have created an account with SendGrid and are logged into the SendGrid dashboard. In the left pane, open the drop-down menu and get into the Setup Guide. Click Start where it says Integrate using our Web API or SMTP Relay.
Choose SMTP Relay from the available options.
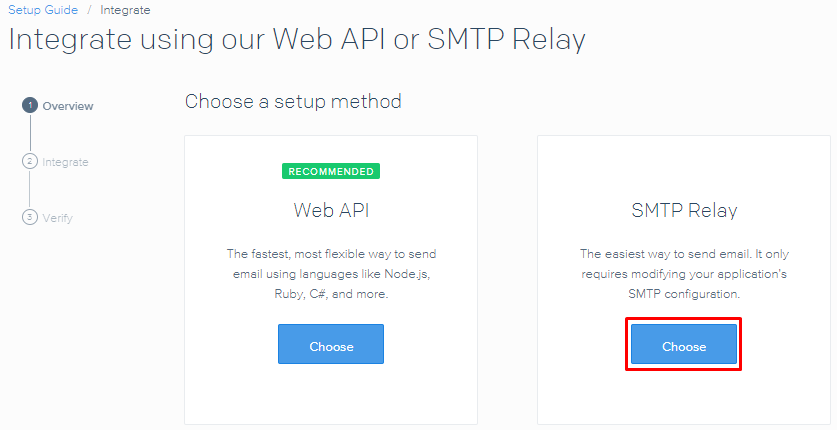
On the next screen, SendGrid will ask for the name of your API key. Name it anything you want, and click Create Key.


Copy this key and paste it in the Password field on the Cloudways platform. Set the username as apikey and click the Save button.
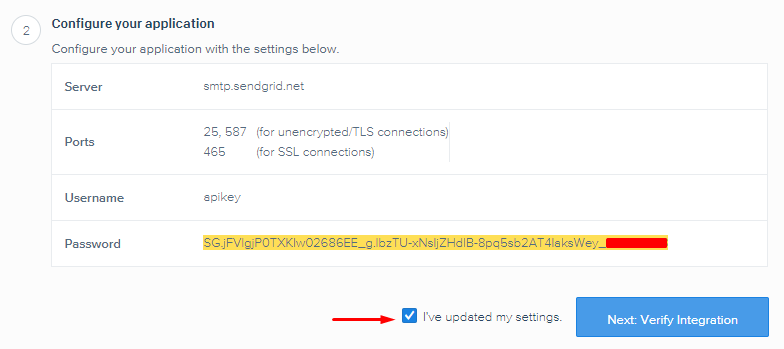
Get back to the SendGrid dashboard, check the highlighted box (see the following screenshot), and click the Next: Verify Integration button.
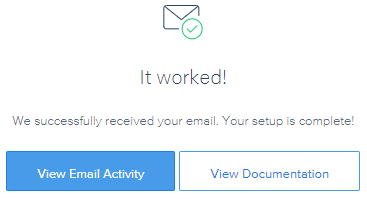
On the next screen, click on Verify Integration, and you will get a success message.
Verify Domain & Email Links
Again, just like Mailgun, SendGrid also recommends verifying the domain names as well as Email links to ensure the delivery of your emails. In SendGrid, they are called White labeling.
They have excellent guides on Whitelabeling Domain and Email Links.
By following the above process, your server will start using Sendgrid SMTP for outgoing emails.
Configure Gmail SMTP for WordPress
Here is a step-by-step guide to set up Gmail SMTP on your hosting server.
Prerequisites
Before setting up Gmail SMTP, read these precautions carefully.
- If you have enabled Two-Factor Authentication on your Gmail account, you need to generate a special password and note it down, as it will be required for different password fields.
- If you have not enabled Two-Factor Authentication, you just need to allow access to less secure apps from here. Just click the Turn On button.
- You need to authorize your server to access your Gmail account. If you have merged more than one account on Gmail, log in with the main account, open this link, and click the Continue button.
So without further delay, let’s set up Gmail SMTP on the server.
Come back to the Cloudways platform, and you can see that Gmail SMTP is not among the available options. To work around this, select the Other option to setup Gmail SMTP on the server and enter the details as follows:
- Host: smtp.gmail.com
- Port: 587
- Username: Your Gmail Email Address
- Password: Your Gmail Password (or App Generated Password)
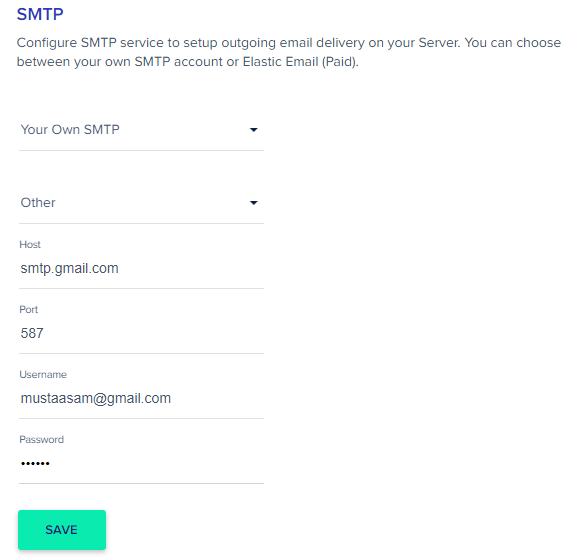
In fact, by following the above steps, you can configure any third-party SMTP service provider that is not on the list.
Do Not Forget To Read This Note:
By setting up SMTP on a server, all applications will use these WordPress SMTP settings. Make sure to change the From Address on each application.
Get into your application, navigate to the Application Settings, and look for FROM ADDRESS. Enter an email address that will be displayed as a “From Address” for every transactional (SMTP)/outgoing email.
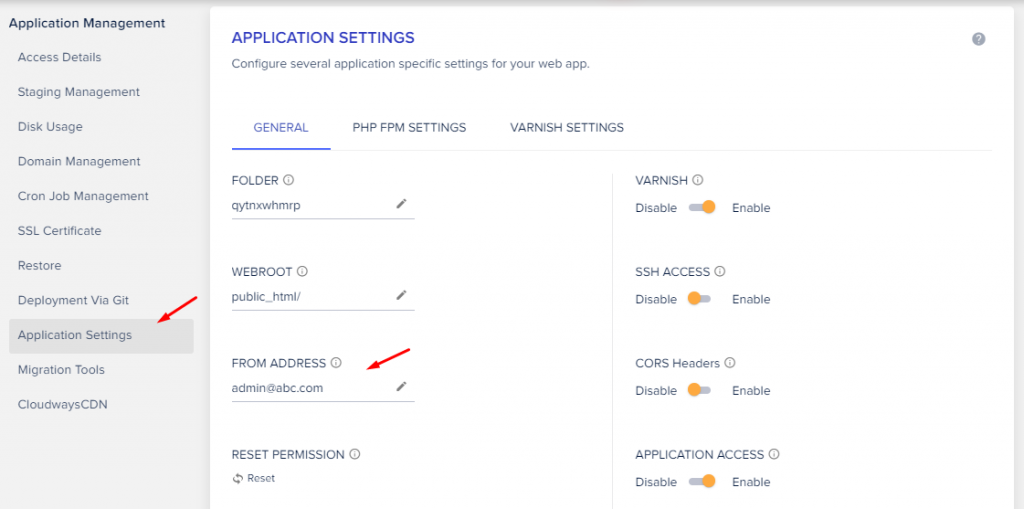
If you have multiple servers, repeat the above step for each server.
WordPress SMTP Plugin
If you do not want to set up SMTP on a server, you can use any WordPress SMTP plugin and configure it to send outgoing emails.
You need to choose which WordPress SMTP plugin you want to use. We have a detailed guide on the Post SMTP mailer, and this guide is focused on WP Mail SMTP by WPForms.
After you have installed and activated the plugin, you will see a new WP Mail SMTP label under the Settings menu.
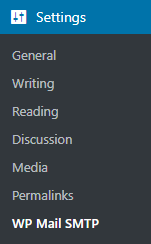
There are just three steps to set up the WP Mail SMTP plugin. Let’s cover them by one!
Enter Email Address
Generally, businesses prefer to use the official email address to send outgoing emails; it is essential to change this address from the default address, usually [email protected].
Enter the email address you wish to use for your outgoing emails and the name from which receipts will receive the emails.
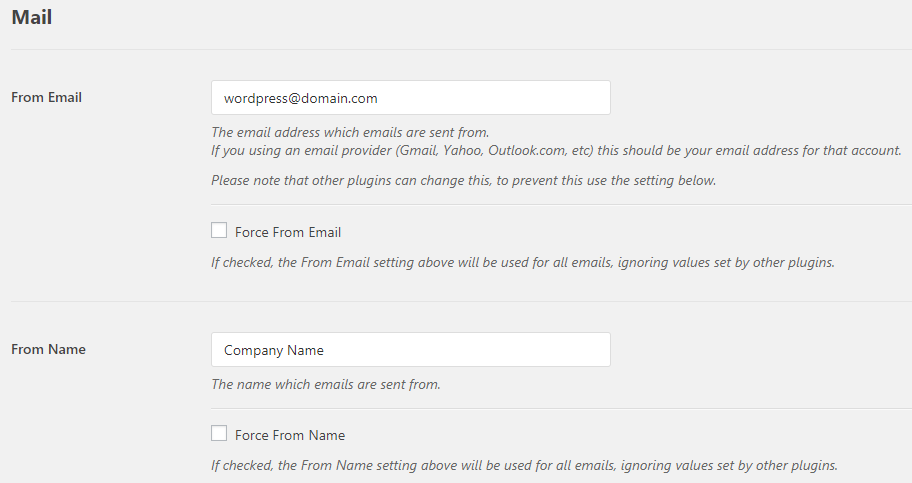
Note that several plugins might conflict with the WP Mail SMTP plugin while choosing the ‘from’ email and name. To avoid this, check the Force From Email and Force From Name checkboxes.
Set up Mailer

The next step is to set up an SMTP service provider. In this example, I will explain to set up:
- MailGun SMTP for WordPress
- SendGrid SMTP for WordPress
- Gmail SMTP for WordPress
If your SMTP provider is not on the above list, you don’t need to worry. The steps for setting up your SMTP provider are generally the same.
WordPress Emails Setup via MailGun SMTP:
Follow these steps to get the API Key and paste it into the WP Mail SMTP plugin. Log in to the Mailgun account and copy the exact domain name to enter the correct domain name.
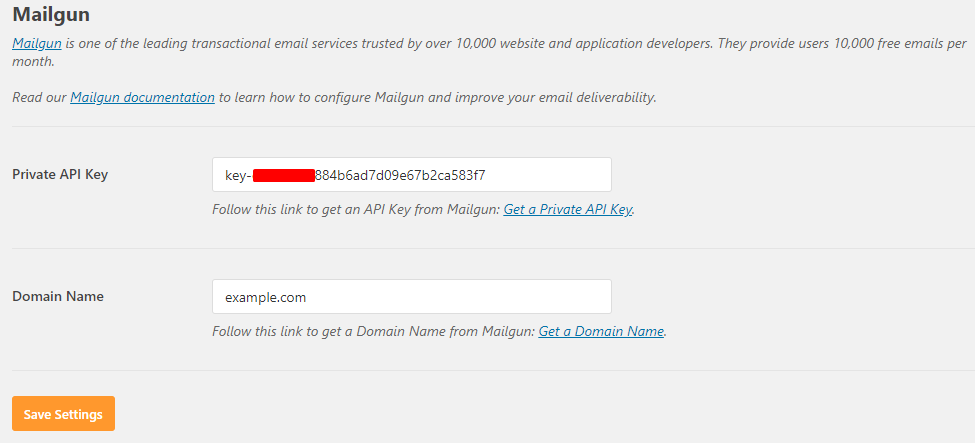
Don’t forget to click Save Settings at the bottom of the page. Now, navigate to the Email Test tab at the top and send a test email to your email address.
WordPress Emails Setup via SendGrid SMTP:
Follow these steps to get the API Key and paste in WP Mail SMTP plugin and click Save Settings.
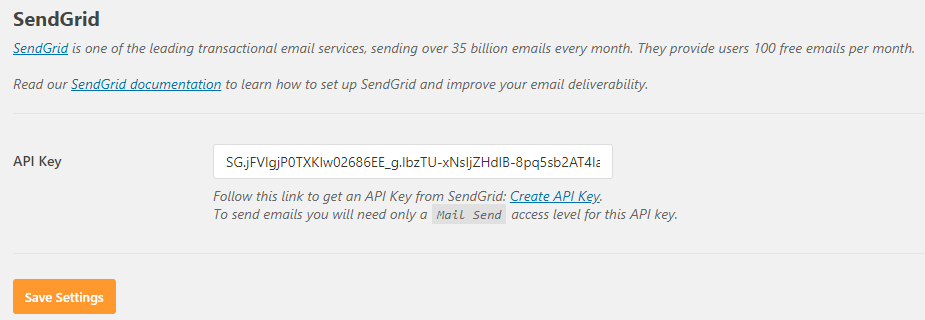
Go to the Email Test tab, enter the email address where you want to receive the test email. And, you should get the test email, similar to the following:

WordPress Emails Setup via Gmail SMTP:
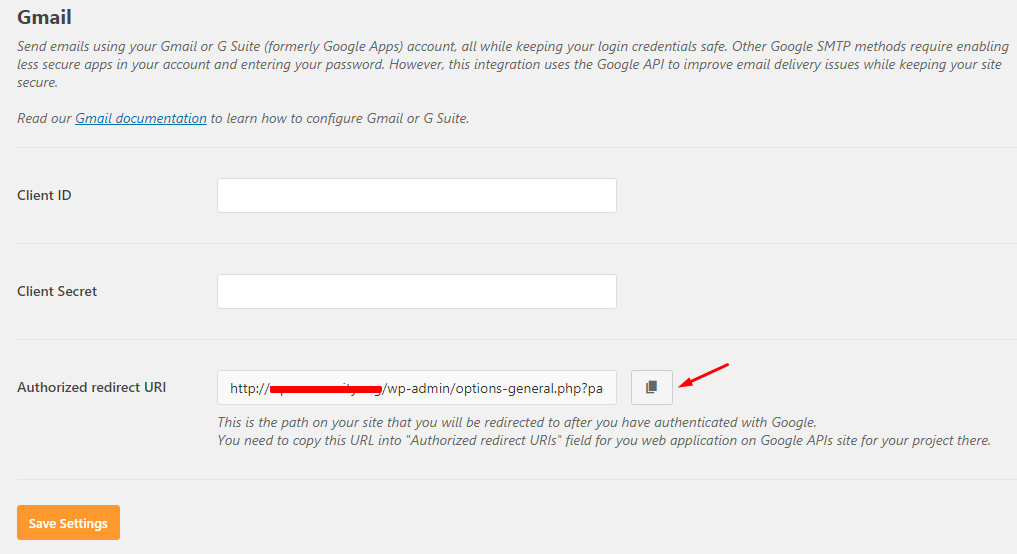
Unlike Mailgun and Sendgrid, you need to put some extra effort into setting up Gmail SMTP using WP Mail SMTP. You need to get a Client ID and Client Secret.
Read these precautions carefully.
- If you have enabled two-factor authentication on your Gmail account. You need to generate a special password and note it down, as it will be required for different password fields. Follow Sign in using App Passwords to generate an app password.
- If you have not enabled two-factor authentication, you just need to allow access to less secure apps. Just toggle the Turn On button.
- You need to authorize your server to access your Gmail account. If you have merged more than one account on Gmail → log in with the main account, → allow access to your Google account and click on the Continue button.
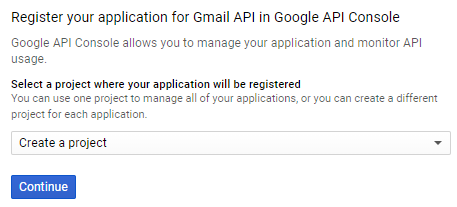
The next step involves the configuration of Gmail. Log in to the Google developer console with your Gmail ID, create a project, and enable your WordPress site’s Gmail API.
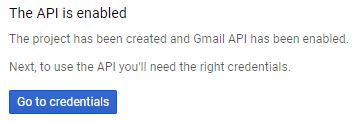
Click Go to credentials to get the credentials required for setting up your Gmail SMTP on WordPress.
Set the options as shown below:

Click the What credentials do I need? button to proceed to the final step of getting your Client ID.
- For the Name field, provide the name of your choice
- Under Authorized JavaScript origins, enter your site URL
- For an Authorized redirect URL, copy the URL from the WP Mail SMTP plugin settings page.
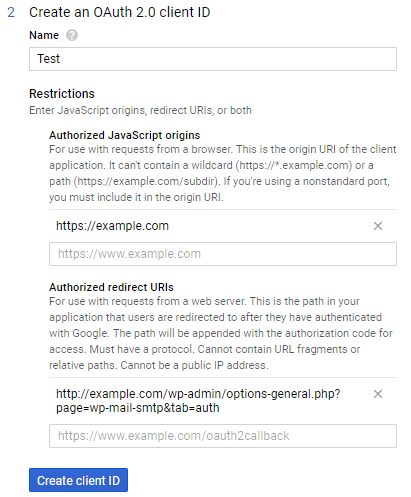
Now click Create client ID on the next page. Check your email address and the Product name to verify your details, and then click Continue.

Click I’ll do this later, and on the next screen, click Edit to reveal Client ID and Client Secret.


Copy these and go back to the WP Mail SMTP plugin dashboard and paste it under Gmail settings.
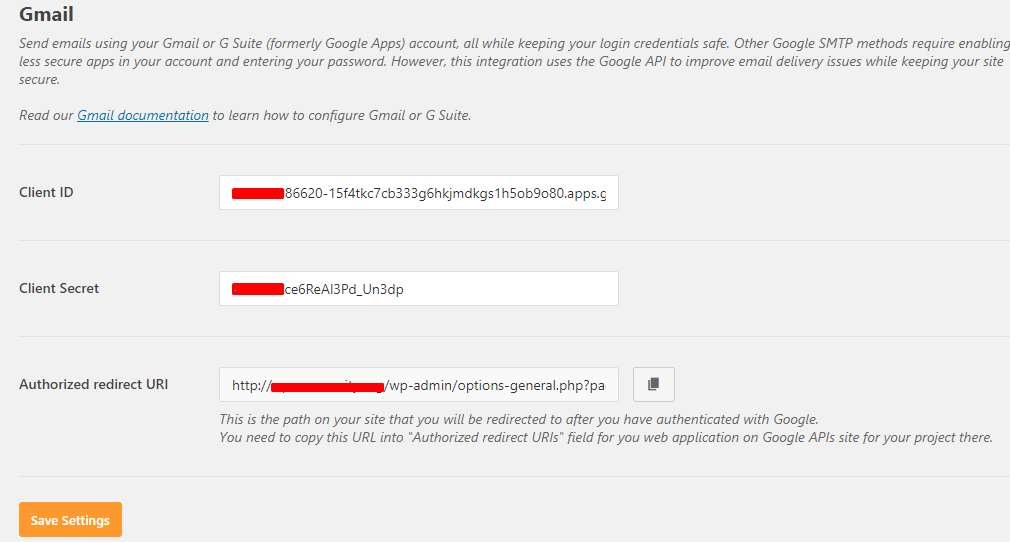
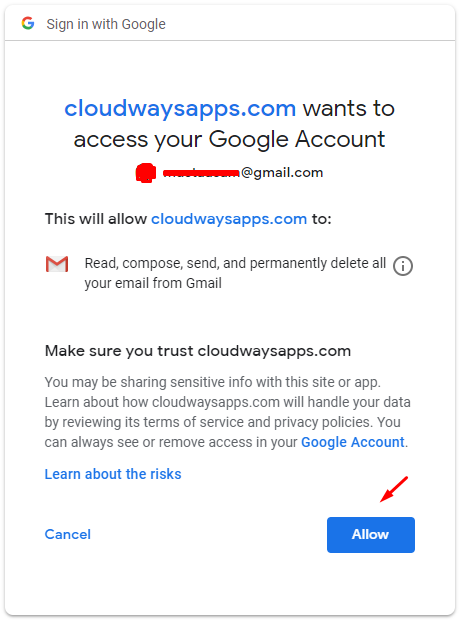
Click the Save Settings button. Next, authorize the WP Mail SMTP plugin to use your Gmail account to send WordPress emails.

While authorized, you may get a warning because the domain name does not have an SSL certificate. To avoid this, you need to add an SSL certificate to your WordPress site.
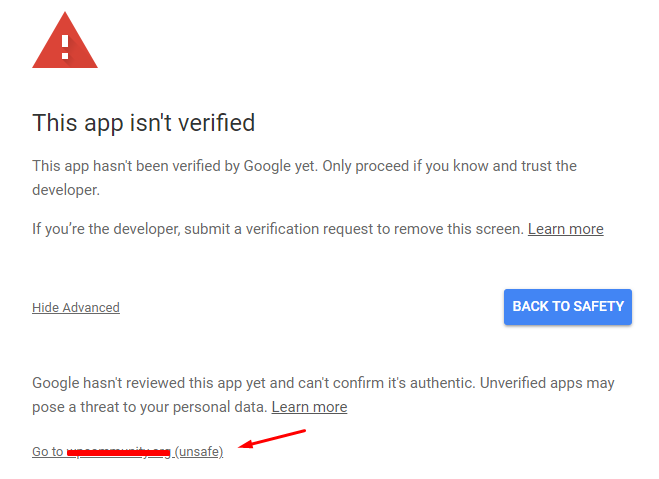
Once allowed, navigate to the Email Test tab at the top to test your newly configured Gmail SMTP email.
Send Test Email
Once successfully installed and configured, Gmail SMTP on WordPress. Simply enter an email and hit the Send Test button.

And that’s it! But before I move further, let me warn you that Gmail (the free version) restricts you to only 500 emails or 500 recipients per day.
If you want more, then try out premium SMTP providers that offer fewer limitations. The steps are similar to those described above, and you just need to configure the settings as per the SMTP provider.
If you have any queries or get stuck at any step, feel free to comment below. I would love to help you out!
Q. What is SMTP?
SMTP stands for Simple Mail Transfer Protocol, which ensures that the email is originated from an authorized source. Setting up an SMTP service provider improves email delivery.
Q. What is Post SMTP?
Post SMTP is a fork of the Postman SMTP plugin, which was removed from the WordPress repository due to an XSS vulnerability. The Post SMTP plugin is used to set up an SMTP service provider.
Q. How do I use SMTP in WordPress?
There are two ways to set up SMTP in WordPress. Configure it on your WordPress hosting provider (if they allow) or use any WordPress SMTP plugin such as Post SMTP Mailer or WP Mail SMTP.


